To livestream a lightboard presentation to a distant audience, the camera must be left-right flipped. One option to accomplish this which can be used with any type of camera (including webcams or video cameras paired with a capture device) using the free and open source Open Broadcaster Software (OBS). OBS can also be a useful tool for recording videos to a file on your computer.
There are many additional functions available in this program. In this resource we will focus only on configuring the basics to get you started with a lightboard.
Install OBS
Navigate to https://obsproject.com/ and select your operating system. The download will begin automatically.
Launch the downloaded application and install using the standard settings.
Open OBS and follow the Auto-Configuration Wizard under Tools. You will get a prompt asking whether to optimize for streaming or recording. If you plan to do any live stream broadcasts, select that option; otherwise, select recording. Affected settings can be changed later if needed.
Select your preferred Base Resolution and frame rate (FPS). 1920x1080 and 30FPS is our recommended starting setting.
Configure Video Input
Connect and ensure your webcam/camera is on.
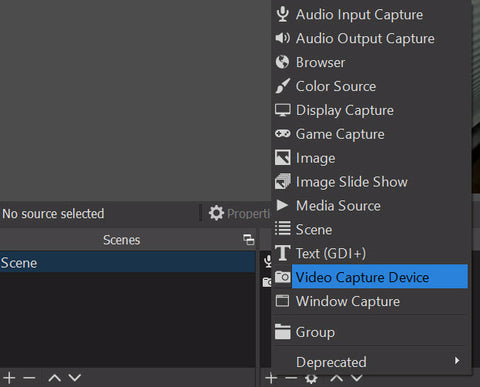
Click the + icon under Sources in the bottom quarter of your screen and select Video Capture Device.

A pop-up will appear. Create a new source and name it Camera and leave the default settings selected before pressing OK. In the next window, under Device, select the desired camera.

If using a USB webcam, you may need to adjust Resolution/FPS Type to Custom. Then set the Resolution and FPS (frame rate) as desired, then press OK. 1920x1080 and 30FPS is appropriate for the majority of lightboard users. You may need to modify your camera settings by clicking Configure Video. This is where you can go to lock focus and exposure settings into manual control.
Your camera image will now show in the OBS workspace. Resize the red-framed camera image to fill the frame.
Right click on the camera source and select Transform → Flip Horizontal. This mirrors the camera feed so writing on the lightboard will appear correct in the final video. Check the video image in OBS to ensure that text is legible when written normally on the lightboard.
Note, this guide is written somewhat generically to support all lightboard users. Cameras included with our Classroom & Office Packages already left-right mirror the video so this setting does not need to be used. Follow the same steps to toggle this option on or off.

Configure Microphone Input
Click the + icon under Sources in the bottom quarter of your screen and select Audio Input Capture.
A pop-up will appear. Create a new source and name it Mic and press OK. In the next window, under Device, select the desired microphone.
Record a Video
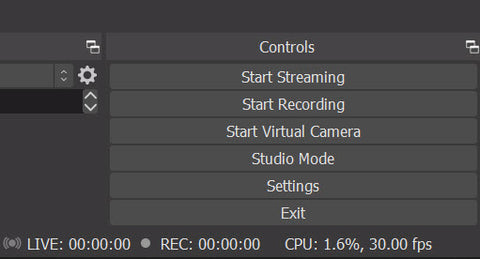
You are now ready to record a video. Do a test recording behind the lightboard. When ready, click Start Recording on the far right. Click Stop Recording when completed.

The video needs to be converted to a .mp4 file. In the top left corner, click File -> Remux Recordings. Choose the 3 dots between OBS Recording and Target File. In the pop-up dialogue box, choose your recent video file. Click Remux. Your .mp4 is now ready to go, most likely located in your default Videos folder on your computer.

Side note: OBS records to an MKV type file so that in the event of a recording interruption, the recorded file is still usable. This is not possible if recording directly to a mp4). If you can live with that risk to avoid an extra step each time, change the file type to mp4 under File --> Settings --> Output -->Recording Format
Go Live
Going live is a great way to use a lightboard. The easiest way by far to do this with OBS is to use the VirtualCam feature.
Note: this feature was made standard in OBS version 26.1. If you don't see this function, make sure you update to the latest version of OBS.
When ready to go live, click Start Virtual Camera in the lower right.

You can now choose OBS-Camera as your video source in your preferred video conferencing software. You should see the same video feed as shown in OBS. Be sure to choose the same microphone source as you chose earlier, to be your mic for the call.
Mac Users
***If you are using MacOS and are having issues with trying to use PowerPoint with OBS, other users have suggested to do the following:Please ensure OBS has permissions to access your microphone & capture devices.
1) Select System Preferences from the Apple menu.
2) Click the icon labelled Security & Privacy.
3) Click the Privacy tab at the top.
4) In the lefthand column, click on 'Microphone', 'Camera', or 'Screen recording' to manage app permissions.
5) Choose Screen recording.
6) Tick the box for OBS.
